
七、resultMap详解
如果数据库字段和实体的字段是一一对应,那么MyBatis会【自动映射】,但是如果不一致,比如一个叫user一个叫username,那么就需要我们手动的建立一一映射的关系了。
有时候我们的数据库和字段和实例的字段可能不是一一对应,
1、Java中的实体类设计
public class User {

   private int id;  		 //id
   private String name;          //姓名,数据库为username
   private String password;     //密码,一致

   //构造
   //set/get
   //toString()
}
3、mapper
//根据id查询用户
User selectUserById(int id);
4、mapper映射文件
<select id="selectUserById" resultType="user">
  select * from user where id = #{id}
</select>
5、测试
@Test
public void testSelectUserById() {
   UserMapper mapper = session.getMapper(UserMapper.class);
   User user = mapper.selectUserById(1);
   System.out.println(user);
   session.close();
}
结果:
- User{id=1, name='null', password='123'}
- 查询出来发现 name为空 . 说明出现了问题!
分析:
- select * from user where id = #{id} 可以看做select id,username,password from user where id = #{id}
- mybatis会根据这些查询的列名(会将列名转化为小写,数据库不区分大小写) , 利用反射去对应的实体类中查找相应列名的set方法设值 ,当然找不到username
解决方案
方案一:为列名指定别名 , 别名和java实体类的属性名一致 .
<select id="selectUserById" resultType="User">
  select id , username as name ,password from user where id = #{id}
</select>
方案二:使用结果集映射->ResultMap 【推荐】
<resultMap id="UserMap" type="User">
   <!-- id为主键 -->
   <id column="id" property="id"/>
   <!-- column是数据库表的列名 , property是对应实体类的属性名 -->
   <result column="username" property="name"/>
   <result column="password" property="password"/>
</resultMap>

<select id="selectUserById" resultMap="UserMap">
  select id , username , password from user where id = #{id}
</select>
结论:
这个地方我们手动调整了映射关系,称之为【手动映射】。
但如果不调整呢? MyBatis当然会按照约定自动映射。
有了映射这种牛逼的事情之后:
我们的:
prepareStatement.setInt(1,21);
prepareStatement.setString(2,"IT楠老师");
还用写吗?两个字【牛逼】!
当然约定的最基本的操作就是全部都一样,还有就是下划线和驼峰命名的自动转化
<settings>
    <!--开启驼峰命名规则-->
    <setting name="mapUnderscoreToCamelCase" value="true"/>
</settings>
自定义数据源
public class MyDataSource implements DataSourceFactory {
    private Properties properties;

    @Override
    public void setProperties(Properties properties) {
        this.properties = properties;
    }

    @Override
    public DataSource getDataSource() {

        HikariConfig hikariConfig = new HikariConfig(properties);
        return new HikariDataSource(hikariConfig);
    }
}
username=root
password=root
jdbcUrl=jdbc:mysql://127.0.0.1:3306/ssm?useUnicode=true&characterEncoding=utf8&serverTimezone=Asia/Shanghai&allowPublicKeyRetrieval=true&useSSL=false
driverClassName=com.mysql.cj.jdbc.Driver
八、动态sql-很重要
1、 概述
MyBatis提供了对SQL语句动态的组装能力,大量的判断都可以在 MyBatis的映射XML文件里面配置,以达到许多我们需要大量代码才能实现的功能,大大减少了我们编写代码的工作量。
动态SQL的元素
| 元素 | 作用 | 备注 |
|---|---|---|
| if | 判断语句 | 单条件分支判断 |
| choose、when、otherwise | 相当于Java中的 case when语句 | 多条件分支判断 |
| trim、where、set | 辅助元素 | 用于处理一些SQL拼装问题 |
| foreach | 循环语句 | 在in语句等列举条件常用 |
2、if元素(非常常用)
if元素相当于Java中的if语句,它常常与test属性联合使用。现在我们要根据name去查找学生,但是name是可选的,如下所示:
<select id="findUserById" resultType="com.ydlclass.entity.User">
    select id,username,password from user
    where 1 =1
    <if test="id != null">
        AND id = #{id}
    </if>
    <if test="username != null and username != ''">
        AND username = #{username}
    </if>
    <if test="password != null and password != ''">
        AND password = #{password}
    </if>
</select>
3、where元素
上面的select语句我们加了一个1=1的绝对true的语句,目的是为了防止语句错误,变成SELECT * FROM student WHERE这样where后没有内容的错误语句。这样会有点奇怪,此时可以使用<where>元素。
<select id="findUserById" resultType="com.ydlclass.entity.User">
    select id,username,password from user
    <where>
        <if test="id != null">
            AND id = #{id}
        </if>
        <if test="username != null and username != ''">
            AND username = #{username}
        </if>
        <if test="password != null and password != ''">
            AND password = #{password}
        </if>
    </where>
</select>
4、trim元素
有时候我们要去掉一些特殊的SQL语法,比如常见的and、or,此时可以使用trim元素。trim元素意味着我们需要去掉一些特殊的字符串,prefix代表的是语句的前缀,而prefixOverrides代表的是你需要去掉的那种字符串,suffix表示语句的后缀,suffixOverrides代表去掉的后缀字符串。
<select id="select" resultType="com.ydlclass.entity.User">
    SELECT * FROM user
    <trim prefix="WHERE" prefixOverrides="AND">
        <if test="username != null and username != ''">
            AND username LIKE concat('%', #{username}, '%')
        </if>
        <if test="id != null">
            AND id = #{id}
        </if>
    </trim>
</select>
5、choose、when、otherwise元素
选一个
有些时候我们还需要多种条件的选择,在Java中我们可以使用switch、case、default语句,而在映射器的动态语句中可以使用choose、when、otherwise元素。
<!-- 有name的时候使用name搜索,没有的时候使用id搜索 -->
<select id="select" resultType="com.ydlclass.entity.User">
    SELECT * FROM user
    WHERE 1=1
    <choose>
        <when test="name != null and name != ''">
            AND username LIKE concat('%', #{username}, '%')
        </when>
        <when test="id != null">
            AND id = #{id}
        </when>
    </choose>
</select>
6、set元素
在update语句中,如果我们只想更新某几个字段的值,这个时候可以使用set元素配合if元素来完成。注意:set元素遇到,会自动把,去掉。
<update id="update">
    UPDATE user
    <set>
        <if test="username != null and username != ''">
            username = #{username},
        </if>
        <if test="password != null and password != ''">
            password = #{password}
        </if>
    </set>
    WHERE id = #{id}
</update>
7、foreach元素
foreach元素是一个循环语句,它的作用是遍历集合,可以支持数组、List、Set接口。
<select id="select" resultType="com.ydlclass.entity.User">
    SELECT * FROM user
    WHERE id IN
    <foreach collection="ids" open="(" close=")" separator="," item="id">
        #{id}
    </foreach>
</select>
- collection配置的是传递进来的参数名称。
- item配置的是循环中当前的元素。
- index配置的是当前元素在集合的位置下标。
- open和 close配置的是以什么符号将这些集合元素包装起来。
- separator是各个元素的间隔符。
8、foreach批量插入
<insert id="batchInsert" parameterType="list">
    insert into `user`( user_name, pass)
    values
    <foreach collection="users" item="user" separator=",">
        (#{user.username}, #{user.password})
    </foreach>

</insert>
9、SQL片段
有时候可能某个 sql 语句我们用的特别多,为了增加代码的重用性,简化代码,我们需要将这些代码抽取出来,然后使用时直接调用。
提取SQL片段:
<sql id="if-title-author">
   <if test="title != null">
      title = #{title}
   </if>
   <if test="author != null">
      and author = #{author}
   </if>
</sql>
引用SQL片段:
<select id="queryBlogIf" parameterType="map" resultType="blog">
  select * from blog
   <where>
       <!-- 引用 sql 片段,如果refid 指定的不在本文件中,那么需要在前面加上 namespace -->
       <include refid="if-title-author"></include>
       <!-- 在这里还可以引用其他的 sql 片段 -->
   </where>
</select>
九、数据关系处理
三种方法
1.直接sql 多次查询
2.按查询嵌套
通过association collection去其他mapper.xml里找
column="did" 是传过去的参数 select="com.ydlclass.mapper.DeptMapper.select" 是调用的地址
<resultMap id="employeeMap" type="employee">
        <id column="id" property="id" />
        <result column="name" property="name"/>
        <association property="dept" column="did" javaType="dept"
                     select="com.ydlclass.mapper.DeptMapper.select">
            <id column="id" property="id"/>
            <result column="name" property="name"/>

        </association>
    </resultMap>
3.按结果嵌套
结果嵌套是使用复杂查询,在根据结果的字段进行对象的封装,本质只会发送一个sql。
无需column 无需 select
<resultMap id="employeeMap2" type="employee">
        <id column="eid" property="id" />
        <result column="ename" property="name"/>
        <association property="dept" javaType="dept" >
            <id column="did" property="id"/>
            <result column="dname" property="name"/>
        </association>
    </resultMap>

    <select id="select2" resultMap="employeeMap2" >
        select e.id eid,e.name ename, d.id did,d.name dname
        from employee e left join dept d
                                  on d.id = e.did
    </select>

与语句中的名字相对应
- 部门和员工的关系,一个部门多个员工,一个员工属于一个部门
- 那我们可以采取两种方式来维护关系,一种在一的一方,一种在多的一方!
数据库设计
CREATE TABLE `dept` (
`id` INT(10) NOT NULL,
`name` VARCHAR(30) DEFAULT NULL,
PRIMARY KEY (`id`)
);

INSERT INTO dept VALUES (1, '元动力学习一组'),(2, '元动力学习二组');

CREATE TABLE `employee` (
`id` INT(10) NOT NULL,
`name` VARCHAR(30) DEFAULT NULL,
`did` INT(10) DEFAULT NULL,
PRIMARY KEY (`id`),
CONSTRAINT `fk_did` FOREIGN KEY (`did`) REFERENCES `dept` (`id`)
) ;


INSERT INTO employee VALUES (1, '邸智伟', 1),(2, '成虹', 2),(3, '康永亮', 1),(4, '杨春旺', 2),(5, '陈建强', 1);
1、通过员工级联部门
1、编写实体类
@Data
@AllArgsConstructor
@NoArgsConstructor
public class Dept  implements Serializable{

    private static final Long serialVersionUID = 1L;

    private int id;
    private String name;

}

@Data
@AllArgsConstructor
@NoArgsConstructor
public class Employee  implements Serializable {

    private static final Long serialVersionUID = 1L;

    private int id;
    private String name;
    //维护关系
    private Dept dept;
}
2、编写实体类对应的Mapper接口
public interface DeptMapper {
}
public interface EmployeeMapper {
}
3、编写Mapper接口对应的 mapper.xml配置文件
<?xml version="1.0" encoding="UTF-8" ?>
<!DOCTYPE mapper
        PUBLIC "-//mybatis.org//DTD Mapper 3.0//EN"
        "http://mybatis.org/dtd/mybatis-3-mapper.dtd">
<mapper namespace="com.ydlclass.dao.DeptMapper">

</mapper>


<?xml version="1.0" encoding="UTF-8" ?>
<!DOCTYPE mapper
        PUBLIC "-//mybatis.org//DTD Mapper 3.0//EN"
        "http://mybatis.org/dtd/mybatis-3-mapper.dtd">
<mapper namespace="com.ydlclass.dao.EmployeeMapper">

</mapper>
4、将mapper进行注册、去mybatis-config文件中配置
<mapper resource="com/ydlclass/dao/DeptMapper.xml"/>
<mapper resource="com/ydlclass/dao/EmployeeMapper.xml"/>
(1)按查询嵌套
这种方式是一种级联查询的方式,会产生多个sql语句,第一个sql的查询语句结果会触发第二个查询语句。
1、写方法
List<Employee> select(Employee employee);
2、mapper处理
<?xml version="1.0" encoding="UTF-8" ?>
<!DOCTYPE mapper
        PUBLIC "-//mybatis.org//DTD Mapper 3.0//EN"
        "http://mybatis.org/dtd/mybatis-3-mapper.dtd">
<mapper namespace="com.ydlclass.mapper.EmployeeMapper">

    <resultMap id="employeeMap" type="employee">
        <id column="id" property="id" />
        <result column="name" property="name"/>
        <association property="dept" column="did" javaType="dept"
                     select="com.ydlclass.mapper.DeptMapper.select">
            <id column="id" property="id"/>
            <result column="name" property="name"/>

        </association>
    </resultMap>

    <sql id="sql">
        `id`,`name`,`did`
    </sql>


    <select id="select" resultMap="employeeMap">
        select <include refid="sql" />
        from employee
    </select>

</mapper>
<?xml version="1.0" encoding="UTF-8" ?>
<!DOCTYPE mapper
        PUBLIC "-//mybatis.org//DTD Mapper 3.0//EN"
        "http://mybatis.org/dtd/mybatis-3-mapper.dtd">
<mapper namespace="com.ydlclass.mapper.DeptMapper">

    <resultMap id="deptMap" type="dept">
        <id column="id" property="id"/>
        <result column="name" property="name"/>
        <collection property="employees" javaType="list" ofType="employee"
                    column="id" select="com.ydlclass.mapper.EmployeeMapper.selectByDid">
            <id column="eid" property="id"/>
            <result column="ename" property="name"/>
        </collection>
    </resultMap>

    <sql id="sql">
        `id`
        ,`name`
    </sql>

    <select id="select" resultMap="deptMap">
        select
        <include refid="sql"/>
        from dept where id = #{id}
    </select>

</mapper>
3、编写完毕去Mybatis配置文件中,注册Mapper
4、测试
@Test
public void testSelect() {
    try (SqlSession session = sqlSessionFactory.openSession(true)) {
        // statement是sql的申明
        EmployeeMapper mapper = session.getMapper(EmployeeMapper.class);
        List<Employee> employees = mapper.select(new Employee());

        log.debug("The employees are [{}]",employees);
    }
}
结果:

(2)按结果嵌套
结果嵌套是使用复杂查询,在根据结果的字段进行对象的封装,本质只会发送一个sql。
1、接口方法编写
List<Employee> select2(Employee employee);
2、编写对应的mapper文件
<?xml version="1.0" encoding="UTF-8" ?>
<!DOCTYPE mapper
        PUBLIC "-//mybatis.org//DTD Mapper 3.0//EN"
        "http://mybatis.org/dtd/mybatis-3-mapper.dtd">
<mapper namespace="com.ydlclass.mapper.EmployeeMapper">

    <resultMap id="employeeMap2" type="employee">
        <id column="eid" property="id" />
        <result column="ename" property="name"/>
        <association property="dept" javaType="dept" >
            <id column="did" property="id"/>
            <result column="dname" property="name"/>
        </association>
    </resultMap>

    <select id="select2" resultMap="employeeMap2" >
        select e.id eid,e.name ename, d.id did,d.name dname
        from employee e left join dept d
                                  on d.id = e.did
    </select>

</mapper>
4、测试
@Test
public void testFindAllEmployees2() {
    EmployeeMapper mapper = session.getMapper(EmployeeMapper.class);
    List<Employee> allEmployees = mapper.findAllEmployees2();
    for (Employee allEmployee : allEmployees) {
        System.out.println(allEmployee);
    }
}
2、通过部门级联用户
在部门处维护关系,此处可以联想订单和订单详情。
修改实体类:
@Data
public class Dept {
    private int id;
    private String name;
    //用于关系维护
    List<Employee> employees;
}

@Data
public class Employee {
    private int id;
    private String name;
}
(1)按结果嵌套处理
1、写方法
public interface DeptMapper {
    List<Dept> select(Dept dept);
}
2、写配置文件
<?xml version="1.0" encoding="UTF-8" ?>
<!DOCTYPE mapper
        PUBLIC "-//mybatis.org//DTD Mapper 3.0//EN"
        "http://mybatis.org/dtd/mybatis-3-mapper.dtd">
<mapper namespace="com.ydlclass.mapper.DeptMapper">

    <resultMap id="deptMap" type="dept">
        <id column="id" property="id"/>
        <result column="name" property="name"/>
        <collection property="employees" javaType="list" ofType="employee"
                    column="id" select="com.ydlclass.mapper.EmployeeMapper.selectByDid">
            <id column="eid" property="id"/>
            <result column="ename" property="name"/>
        </collection>
    </resultMap>

    <sql id="sql">
        `id`,`name`
    </sql>

    <select id="select" resultMap="deptMap">
        select
        <include refid="sql"/>
        from dept where id = #{id}
    </select>

</mapper>
在EmployeeMapper中添加select进行级联查询
<?xml version="1.0" encoding="UTF-8" ?>
<!DOCTYPE mapper
        PUBLIC "-//mybatis.org//DTD Mapper 3.0//EN"
        "http://mybatis.org/dtd/mybatis-3-mapper.dtd">
<mapper namespace="com.ydlclass.mapper.EmployeeMapper">

    <resultMap id="employeeMap" type="employee">
        <id column="id" property="id" />
        <result column="name" property="name"/>
        <association property="dept" column="did" javaType="dept"
                     select="com.ydlclass.mapper.DeptMapper.select">
            <id column="id" property="id"/>
            <result column="name" property="name"/>

        </association>
    </resultMap>

    <resultMap id="employeeMap2" type="employee">
        <id column="eid" property="id" />
        <result column="ename" property="name"/>
        <association property="dept" javaType="dept" >
            <id column="did" property="id"/>
            <result column="dname" property="name"/>
        </association>
    </resultMap>

    <select id="selectByDid" resultMap="employeeMap2" >
        select id eid,name ename from employee where did=#{did}
    </select>

</mapper>
3、测试
@Test
public void testSelect() {
    try (SqlSession session = sqlSessionFactory.openSession(true)) {
        // statement是sql的申明
        DeptMapper mapper = session.getMapper(DeptMapper.class);
        List<Dept> depts = mapper.select(null);
        log.debug("The depts are [{}]", depts);
    }
}

(2)按查询嵌套处理
1、TeacherMapper接口编写方法
List<Dept> select2(Dept dept);
2、编写接口对应的Mapper配置文件
<?xml version="1.0" encoding="UTF-8" ?>
<!DOCTYPE mapper
        PUBLIC "-//mybatis.org//DTD Mapper 3.0//EN"
        "http://mybatis.org/dtd/mybatis-3-mapper.dtd">
<mapper namespace="com.ydlclass.mapper.DeptMapper">
    <resultMap id="deptMap2" type="dept">
        <id column="did" property="id"/>
        <result column="dname" property="name"/>
        <collection property="employees" javaType="list" ofType="employee">
            <id column="eid" property="id"/>
            <result column="ename" property="name"/>

        </collection>
    </resultMap>

    <sql id="sql">
        `id`,`name`
    </sql>


    <select id="select2" resultMap="deptMap2">
        select d.id did, d.name dname, e.id eid, e.name ename
        from dept d
                 left join employee e on d.id = e.did
    </select>
</mapper>
3、测试
@Test
public void testSelect2() {
    try (SqlSession session = sqlSessionFactory.openSession(true)) {
        // statement是sql的申明
        DeptMapper mapper = session.getMapper(DeptMapper.class);
        List<Dept> depts = mapper.select2(null);
        log.debug("The depts are [{}]", depts);
    }
}
结果:

3、小知识:
(1)懒加载
通俗的讲就是按需加载,我们需要什么的时候再去进行什么操作。而且先从单表查询,需要时再从关联表去关联查询,能大大提高数据库性能,因为查询单表要比关联查询多张表速度要快。
在mybatis中,resultMap可以实现高级映射(使用association、collection实现一对一及一对多映射),association、collection具备延迟加载功能。
<!-- 开启懒加载配置 -->
<settings>
  <!-- 延迟加载的全局开关。当开启时,所有关联对象都会延迟加载。 -->
  <setting name="lazyLoadingEnabled" value="true"/>
  <!-- 开启时,任一方法的调用都会加载该对象的所有延迟加载属性。 否则,每个延迟加载属性会按需加载 -->
  <setting name="aggressiveLazyLoading" value="false"/>
</settings>
(2)Mybatis 获取自增主键的方式
使用 xml
直接在标签属性上添加 useGeneratedKeys(是否是自增长,必须设置 true) 和 keyProperty(实体类主键属性名称) 、keyColumn(数据库主键字段名称)
<insert id="insert" useGeneratedKeys="true" keyColumn="id" keyProperty="id">
    insert into `user`(id, username, password)
    values (#{id}, #{username}, #{password})
</insert>
注解方式 useGeneratedKeys(是否是自增长,必须设置 true) 和 keyProperty(实体类主键属性名称) 、keyColumn(数据库主键字段名称)
@Insert("INSERT INTO user(name,age) VALUES(#{user.name},#{user.age})")
@Options(useGeneratedKeys=true, keyProperty="user.id",keyColumn="id"  )
public int insert(@Param("user")User user);
也可以全局设置
注意 记得id 要为 Integer 否则没有null
<setting name="useGeneratedKeys" value="true"/>
@Test
    public void testInsert() {
        try (SqlSession session = sqlSessionFactory.openSession()) {
            try {
                UserMapper mapper = session.getMapper(UserMapper.class);
                User param = new User(null, "hj1j", "hjjyyds");
                int i = mapper.insert(param);
                log.debug("user is [{}]", i);
                log.debug("{}", param.getId());
                session.commit();
            } catch (Exception e) {
                log.error("chao", e);
                session.rollback();
            }
        }
    }
十、Mybatis缓存
1、为什么要用缓存?
- 如果缓存中有数据,就不用从数据库获取,大大提高系统性能。
- MyBatis提供一级缓存和二级缓存
2、一级缓存:
一级缓存是sqlsession级别的缓存
- 在操作数据库时,需要构造sqlsession对象,在对象中有一个数据结构(HashMap)用于存储缓存数据
- 不同的sqlsession之间的缓存区域是互相不影响的。
一级缓存工作原理:
图解:
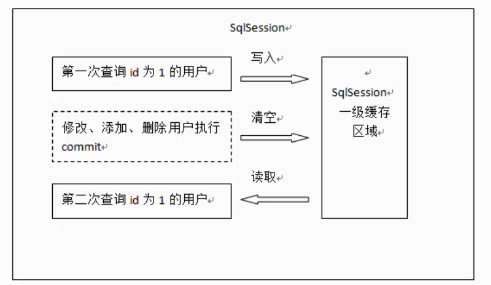
- 第一次发起查询sql查询用户id为1的用户,先去找缓存中是否有id为1的用户,如果没有,再去数据库查询用户信息。得到用户信息,将用户信息存储到一级缓存中。
- 如果sqlsession执行了commit操作(插入,更新,删除),会清空sqlsession中的一级缓存,避免脏读
- 第二次发起查询id为1的用户,缓存中如果找到了,直接从缓存中获取用户信息
- MyBatis默认支持并开启一级缓存。
一级缓存演示
1、必须配置日志,要不看不见
2、编写接口方法
//根据id查询用户
User findUserById(@Param("id") int id);
3、接口对应的Mapper文件
<select id="findUserById" resultType="com.ydlclass.entity.User">
  select * from user where id = #{id}
</select>
4、测试
@Test
public void testFindUserById(){
    UserMapper mapper = session.getMapper(UserMapper.class);
    User user1 = mapper.findUserById(1);
    System.out.println(user1);
    User user2 = mapper.findUserById(3);
    System.out.println(user2);
    User user3 = mapper.findUserById(1);
    System.out.println(user3);
}
5、通过日志分析
[com.ydlclass.dao.UserMapper.findUserById]-==>  Preparing: select id,username,password from user where id = ?
[com.ydlclass.dao.UserMapper.findUserById]-==> Parameters: 1(Integer)
[com.ydlclass.dao.UserMapper.findUserById]-<==      Total: 1
User{id=1, username='楠哥', password='123456'}         ---->ID为1,第一次有sql
[com.ydlclass.dao.UserMapper.findUserById]-==>  Preparing: select id,username,password from user where id = ?
[com.ydlclass.dao.UserMapper.findUserById]-==> Parameters: 3(Integer)
[com.ydlclass.dao.UserMapper.findUserById]-<==      Total: 1
User{id=3, username='磊哥', password='987654'}         ---->ID为3,第一次有sql
User{id=1, username='楠哥', password='123456'}         ---->ID为1,第二次无sql,走缓存
一级缓存失效
- sqlSession不同
- 当sqlSession对象相同的时候,查询的条件不同,原因是第一次查询时候,一级缓存中没有第二次查询所需要的数据
- 当sqlSession对象相同,两次查询之间进行了插入的操作
- 当sqlSession对象相同,手动清除了一级缓存中的数据
一级缓存生命周期
- MyBatis在开启一个数据库会话时,会创建一个新的SqlSession对象,SqlSession对象中会有一个新的Executor对象,Executor对象中持有一个新的PerpetualCache对象;当会话结束时,SqlSession对象及其内部的Executor对象还有PerpetualCache对象也一并释放掉。
- 如果SqlSession调用了close()方法,会释放掉一级缓存PerpetualCache对象,一级缓存将不可用。
- 如果SqlSession调用了clearCache(),会清空PerpetualCache对象中的数据,但是该对象仍可使用。
- SqlSession中执行了任何一个update操作(update()、delete()、insert()) ,都会清空PerpetualCache对象的数据,但是该对象可以继续使用。
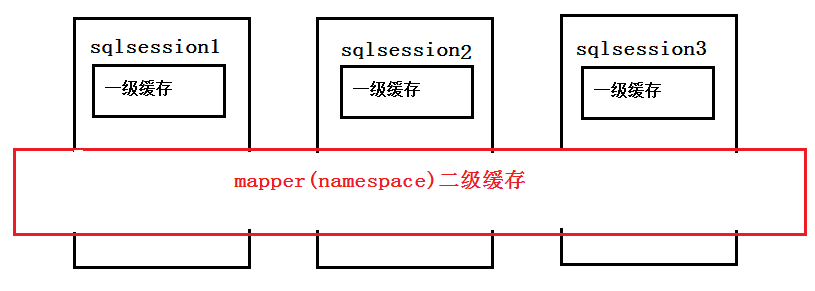
3、二级缓存:
二级缓存是mapper级别的缓存 即sqlSessionFactory
- 多个sqlsession去操作同一个mapper的sql语句,多个sqlsession可以共用二级缓存,所得到的数据会存在二级缓存区域
- 二级缓存是跨sqlsession的
- 二级缓存相比一级缓存的范围更大(按namespace来划分),多个sqlsession可以共享一个二级缓存
二级缓存实现原理
首先要手动开启MyBatis二级缓存。
在config.xml设置二级缓存开关 , 还要在具体的mapper.xml开启二级缓存
<settings>
    <!--开启二级缓存-->
    <setting name="cacheEnabled" value="true"/>
</settings>
<!-- 需要将映射的javabean类实现序列化 -->
class Student implements Serializable{}
<!--开启本Mapper的namespace下的二级缓存-->
<cache eviction="LRU" flushInterval="100000"/>
(1)cache属性的简介:
eviction回收策略(缓存满了的淘汰机制),目前MyBatis提供以下策略。
- LRU(Least Recently Used),最近最少使用的,最长时间不用的对象
- FIFO(First In First Out),先进先出,按对象进入缓存的顺序来移除他们
- SOFT,软引用,移除基于垃圾回收器状态和软引用规则的对象,当内存不足,会触发JVM的GC,如果GC后,内存还是不足,就会把软引用的包裹的对象给干掉,也就是只有内存不足,JVM才会回收该对象。
- WEAK,弱引用,更积极的移除基于垃圾收集器状态和弱引用规则的对象。弱引用的特点是不管内存是否足够,只要发生GC,都会被回收。
flushInterval:刷新间隔时间,单位为毫秒,
- 这里配置的是100秒刷新,如果你不配置它,那么当SQL被执行的时候才会去刷新缓存。
size:引用数目,
- 一个正整数,代表缓存最多可以存储多少个对象,不宜设置过大。设置过大会导致内存溢出。这里配置的是1024个对象
**readOnly:**只读,
- 意味着缓存数据只能读取而不能修改,这样设置的好处是我们可以快速读取缓存,缺点是我们没有办法修改缓存,它的默认值是false,不允许我们修改
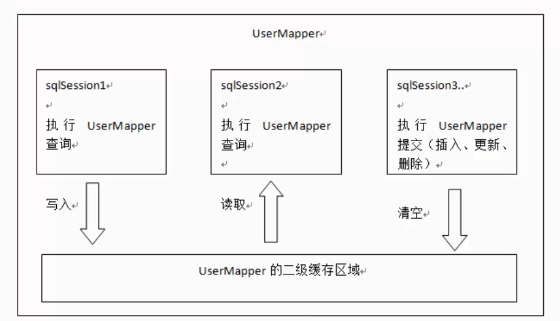
(2)操作过程:
sqlsession1查询用户id为1的信息,查询到之后,会将查询数据存储到二级缓存中。
如果sqlsession3去执行相同mapper下sql,执行commit提交,会清空该mapper下的二级缓存区域的数据
sqlsession2查询用户id为1的信息, 去缓存找是否存在缓存,如果存在直接从缓存中取数据
禁用二级缓存:
在statement中可以设置useCache=false,禁用当前select语句的二级缓存,默认情况为true
<select id="getStudentById" parameterType="java.lang.Integer" resultType="Student" useCache="false">
在实际开发中,针对每次查询都需要最新的数据sql,要设置为useCache="false" ,禁用二级缓存
flushCache标签:刷新缓存(清空缓存)
<select id="getStudentById" parameterType="java.lang.Integer" resultType="Student" flushCache="true">
一般下执行完commit操作都需要刷新缓存,flushCache="true 表示刷新缓存,可以避免脏读
二级缓存应用场景
对于访问多的查询请求并且用户对查询结果实时性要求不高的情况下,可采用MyBatis二级缓存,降低数据库访问量,提高访问速度,如电话账单查询
根据需求设置相应的flushInterval:刷新间隔时间,比如三十分钟,24小时等。
二级缓存局限性:
MyBatis二级缓存对细粒度的数据级别的缓存实现不好,比如如下需求:对商品信息进行缓存,由于商品信息查询访问量大,但是要求用户每次都能查询最新的商品信息,此时如果使用MyBatis的二级缓存就无法实现当一个商品变化时只刷新该商品的缓存信息而不刷新其它商品的信息,因为MyBatis的二级缓存区域以mapper为单位划分,当一个商品信息变化会将所有商品信息的缓存数据全部清空。解决此类问题需要在业务层根据需求对数据有针对性缓存。
二级缓存演示
先不进行配置
@Test
public void testFindUserCache() throws Exception {

    //使用不同的mapper
    UserMapper mapper1 = session.getMapper(UserMapper.class);
    User user1 = mapper1.findUserById(1);
    System.out.println(user1);
    //提交了就会刷到二级缓存,要不还在一级缓存,一定要注意
    session.commit();
    UserMapper mapper2 = session.getMapper(UserMapper.class);
    User user2 = mapper2.findUserById(1);
    System.out.println(user2);
    System.out.println(user1 == user2);
}
结果:
[com.ydlclass.dao.UserMapper.findUserById]-==>  Preparing: select id,username,password from user where id = ?
[com.ydlclass.dao.UserMapper.findUserById]-==> Parameters: 1(Integer)
[com.ydlclass.dao.UserMapper.findUserById]-<==      Total: 1
User{id=1, username='楠哥', password='123456'}
[com.ydlclass.dao.UserMapper.findUserById]-==>  Preparing: select id,username,password from user where id = ?
[com.ydlclass.dao.UserMapper.findUserById]-==> Parameters: 1(Integer)
[com.ydlclass.dao.UserMapper.findUserById]-<==      Total: 1
User{id=1, username='楠哥', password='123456'}
false               ---->两个对象不是一个,发了两个sql,说明缓存没有起作用
可以看见两次同样的sql,却都进库进行了查询。说明二级缓存没开。
配置二级缓存
1、开启全局缓存
<setting name="cacheEnabled" value="true"/>
2、使用二级缓存,这个写在mapper里
<!--开启本Mapper的namespace下的二级缓存-->
<cache eviction="LRU" flushInterval="100000" size="512" readOnly="true"></cache>
<!--
创建了一个 LRU 最少使用清除缓存,每隔 100 秒刷新,最多可以存储 512 个对象,返回的对象是只读的。
-->
3、测试执行
[com.ydlclass.dao.UserMapper.findUserById]-==>  Preparing: select id,username,password from user where id = ?
[com.ydlclass.dao.UserMapper.findUserById]-==> Parameters: 1(Integer)
[com.ydlclass.dao.UserMapper.findUserById]-<==      Total: 1
User{id=1, username='楠哥', password='123456'}
[com.ydlclass.dao.UserMapper]-Cache Hit Ratio [com.ydlclass.dao.UserMapper]: 0.5
User{id=1, username='楠哥', password='123456'}
true                  ---->两个对象一样了,就发了一个sql,说明缓存起了作用
4、第三方缓存--EhCache充当二级缓存
此外还有很多第三方缓存组件,最常用的比如ehcache,Memcached、redis等,我们以比较简单的ehcache为例。
1、引入依赖
<!-- https://mvnrepository.com/artifact/org.mybatis.caches/mybatis-ehcache -->
<dependency>
   <groupId>org.mybatis.caches</groupId>
   <artifactId>mybatis-ehcache</artifactId>
   <version>1.2.1</version>
</dependency>
2、修改mapper.xml中使用对应的缓存
<mapper namespace = “com.ydlclass.entity.User” >
       <cache type="org.mybatis.caches.ehcache.EhcacheCache" eviction="LRU" flushInterval="10000" size="1024" readOnly="true"/>
</mapper>
3、添加ehcache.xml文件,ehcache配置文件,具体配置自行百度
<?xml version="1.0" encoding="UTF-8"?>
<ehcache xmlns:xsi="http://www.w3.org/2001/XMLSchema-instance"
        xsi:noNamespaceSchemaLocation="http://ehcache.org/ehcache.xsd"
        updateCheck="false">
   <!--
      diskStore:为缓存路径,ehcache分为内存和磁盘两级,此属性定义磁盘的缓存位置。参数解释如下:
      user.home – 用户主目录
      user.dir – 用户当前工作目录
      java.io.tmpdir – 默认临时文件路径
    -->
   <diskStore path="./tmpdir/Tmp_EhCache"/>

   <defaultCache
           eternal="false"
           maxElementsInMemory="10000"
           overflowToDisk="false"
           diskPersistent="false"
           timeToIdleSeconds="1800"
           timeToLiveSeconds="259200"
           memoryStoreEvictionPolicy="LRU"/>

</ehcache>

<!--
       name:缓存名称。
       maxElementsInMemory:缓存最大个数。
       eternal:对象是否永久有效,一但设置了,timeout将不起作用。
       timeToIdleSeconds:设置对象在失效前的允许闲置时间(单位:秒)。仅当eternal=false对象不是永久有效时使用,可选属性,默认值是0,也就是可闲置时间无穷大。
       timeToLiveSeconds:设置对象在失效前允许存活时间(单位:秒)。最大时间介于创建时间和失效时间之间。仅当eternal=false对象不是永久有效时使用,默认是0.,也就是对象存活时间无穷大。
       overflowToDisk:当内存中对象数量达到maxElementsInMemory时,Ehcache将会对象写到磁盘中。
       diskSpoolBufferSizeMB:这个参数设置DiskStore(磁盘缓存)的缓存区大小。默认是30MB。每个Cache都应该有自己的一个缓冲区。
       maxElementsOnDisk:硬盘最大缓存个数。
       diskPersistent:是否在磁盘上持久化。指重启jvm后,数据是否有效。默认为false。
       memoryStoreEvictionPolicy:当达到maxElementsInMemory限制时,Ehcache将会根据指定的策略去清理内存。默认策略是LRU(最近最少使用)。你可以设置为FIFO(先进先出)或是LFU(较少使用)。
       clearOnFlush:内存数量最大时是否清除。
    -->
3、测试
5、使用缓存独立控制
其实我们更加常见的是使用第三方的缓存进行存储,并且自由控制
<dependency>
    <groupId>net.sf.ehcache</groupId>
    <artifactId>ehcache</artifactId>
    <version>2.10.3</version>
</dependency>
测试一下
final CacheManager cacheManager = new CacheManager(this.getClass().getClassLoader().getResourceAsStream("ehcache.xml"));

// create the cache called "hello-world"
String[] cacheNames = cacheManager.getCacheNames();
for (String cacheName : cacheNames) {
    System.out.println(cacheName);
}
Cache userDao = cacheManager.getCache("userDao");
Element element = new Element("testFindUserById_1",new User(1,"q","d"));
userDao.put(element);

Element element1 = userDao.get("testFindUserById_1");
User user = (User)element1.getObjectValue();
System.out.println(user);
创建工具类
/**
 * @author zn
 * @date 2021/1/28
 */
public class CacheUtil {

    private static CacheManager cacheManager = new CacheManager(CacheUtil.class.getClassLoader().getResourceAsStream("ehcache.xml"));

    public static void put(String cacheName,String key,Object value){
        Cache cache = cacheManager.getCache(cacheName);
        Element element = new Element(key,value);
        cache.put(element);
    }

    public static Object get(String cacheName,String key){
        Cache cache = cacheManager.getCache(cacheName);
        return cache.get(key).getObjectValue();

    }

    public static boolean  delete(String cacheName,String key){
        Cache cache = cacheManager.getCache(cacheName);
        return cache.remove(key);
    }

}
测试
@Test
public void selectDeptsTest(){

    Map<String,Object> cache = new HashMap<>(8);
    // 执行方法
    List<Dept> depts = deptMapper.selectDepts();
    CacheUtil.put("dept","selectUserByIdTest",depts);
    System.out.println(depts);
    session.commit();

    session = sqlSessionFactory.openSession();
    // 去缓存拿,如果有就拿出来
    List<Dept> newDepts = null;
    Object object = CacheUtil.get("dept", "selectUserByIdTest");
    if(object == null){
        // 去数据库查询
        DeptMapper mapper = session.getMapper(DeptMapper.class);
        newDepts = mapper.selectDepts();
    } else {
        newDepts = (List<Dept>) object;
    }

    System.out.println(newDepts);
}
十一、配置文件
MyBatis的配置文件分为核心配置文件和mapper配置文件
- mybatis-config.xml 系统核心配置文件
- 核心配置文件主要配置Mybatis一些基础组件和加载资源,核心配置文件中的元素常常能影响Mybatis的整个运行过程。
- 能配置的内容如下,顺序不能乱:
1.properties是一个配置属性的元素
2.settings设置,mybatis最为复杂的配置也是最重要的,会改变mybatis运行时候的行为
3.typeAliases别名(在TypeAliasRegistry中可以看到mybatis提供了许多的系统别名)
4.typeHandlers 类型处理器(比如在预处理语句中设置一个参数或者从结果集中获取一个参数时候,都会用到类型处理器,在TypeHandlerRegistry中定义了很多的类型处理器)
5.objectFactory 对象工厂(myabtis在构建一个结果返回的时候,会使用一个ObjectFactory去构建pojo)
6.plugins 插件
7.environments 环境变量
  environment 环境变量
   transactionManager 事务管理器
   dataSource 数据源
   databaseIdProvider 数据库厂商标识
8.mappers 映射器
找几个重要的讲解一下
1、environments元素
environments可以为mybatis配置多环境运行,将SQL映射到多个不同的数据库上,必须指定其中一个为默认运行环境(通过default指定),如果想切换环境修改default的值即可。
最常见的就是,生产环境和开发环境,两个环境切换必将导致数据库的切换。
<environments default="development">
 <environment id="development">
   <transactionManager type="JDBC">
     <property name="..." value="..."/>
   </transactionManager>
   <dataSource type="POOLED">
     <property name="driver" value="${driver}"/>
     <property name="url" value="${url}"/>
     <property name="username" value="${username}"/>
     <property name="password" value="${password}"/>
   </dataSource>
 </environment>

  <environment id="product">
       <transactionManager type="JDBC">
         <property name="..." value="..."/>
       </transactionManager>
       <dataSource type="POOLED">
         <property name="driver" value="${driver}"/>
         <property name="url" value="${url}"/>
         <property name="username" value="${username}"/>
         <property name="password" value="${password}"/>
       </dataSource>
 </environment>
</environments>
- dataSource 元素使用标准的 JDBC 数据源接口来配置 JDBC 连接对象的资源。
- 数据源是必须配置的。
- 有三种内建的数据源类型
type="[UNPOOLED|POOLED|JNDI]") - unpooled:这个数据源的实现只是每次被请求时打开和关闭连接。 - pooled:这种数据源的实现利用“池”的概念将 JDBC 连接对象组织起来 , 这是一种使得并发 Web 应用快速响应请求的流行处理方式。 - jndi:这个数据源的实现是为了能在如 Spring 或应用服务器这类容器中使用,容器可以集中或在外部配置数据源,然后放置一个 JNDI 上下文的引用。1
2
3
4 - 数据源也有很多第三方的实现,比如druid,hikari,dbcp,c3p0等等....
- 这两种事务管理器类型都不需要设置任何属性。
- 具体的一套环境,通过设置id进行区别,id保证唯一!
- 子元素节点:transactionManager - [ 事务管理器 ]
<!-- 语法 --> <transactionManager type="[ JDBC | MANAGED ]"/>1
2 - 子元素节点:数据源(dataSource)
2、mappers元素
mappers的存在就是要对写好的mapper和xml进行统一管理
要不然系统怎么知道我写了哪些mapper
通常这么引入
<mappers>
    <!-- 使用相对于类路径的资源引用 -->
    <mapper resource="com/ydlclass/dao/userMapper.xml"/>
    <!-- 面向注解时使用全类名 -->
    <mapper class="com.ydlclass.dao.AdminMapper"/>
</mappers>

。。。还有其他的方式
Mapper文件
<?xml version="1.0" encoding="UTF-8" ?>
<!DOCTYPE mapper
       PUBLIC "-//mybatis.org//DTD Mapper 3.0//EN"
       "http://mybatis.org/dtd/mybatis-3-mapper.dtd">
<mapper namespace="com.ydlclass.mapper.UserMapper">

</mapper>
- namespace中文意思:命名空间,作用如下:
- namespace的命名必须跟某个接口同名,这才能找的到啊!
3、Properties元素
数据库连接信息我们最好放在一个单独的文件中。
1、 在资源目录下新建一个db.properties
driver=com.mysql.jdbc.Driver
url=jdbc:mysql://localhost:3306/ssm?useSSL=true&useUnicode=true&characterEncoding=utf8
username=root
password=root
2、 将文件导入properties 配置文件
<configuration>
   <!--导入properties文件-->
   <properties resource="db.properties"/>

   <environments default="development">
       <environment id="development">
           <transactionManager type="JDBC"/>
           <dataSource type="POOLED">
               <property name="driver" value="${driver}"/>
               <property name="url" value="${url}"/>
               <property name="username" value="${username}"/>
               <property name="password" value="${password}"/>
           </dataSource>
       </environment>
   </environments>
   <mappers>
       <mapper resource="mapper/UserMapper.xml"/>
   </mappers>
</configuration>
4、其他配置浏览
settings能对我的一些核心功能进行配置,如懒加载、日志实现、缓存开启关闭等
简单参数说明
| 设置参数 | 描述 | 有效值 | 默认值 |
|---|---|---|---|
| cacheEnabled | 该配置影响的所有映射器中配置的缓存的全局开关。 | true | false | true |
| lazyLoadingEnabled | 延迟加载的全局开关。当开启时,所有关联对象都会延迟加载。特定关联关系中可通过设置fetchType属性来覆盖该项的开关状态。 | true | false | false |
| useColumnLabel | 使用列标签代替列名。不同的驱动在这方面会有不同的表现,具体可参考相关驱动文档或通过测试这两种不同的模式来观察所用驱动的结果。 | true | false | true |
| useGeneratedKeys | 允许 JDBC 支持自动生成主键,需要驱动兼容。如果设置为 true 则这个设置强制使用自动生成主键,尽管一些驱动不能兼容但仍可正常工作(比如 Derby)。 | true | false | False |
| defaultStatementTimeout | 设置超时时间,它决定驱动等待数据库响应的秒数。 | Any positive integer | Not Set (null) |
| mapUnderscoreToCamelCase | 是否开启自动驼峰命名规则(camel case)映射,即从经典数据库列名 A_COLUMN 到经典 Java 属性名 aColumn 的类似映射。 | true | false | False |
| logPrefix | 指定 MyBatis 增加到日志名称的前缀。 | Any String | Not set |
| logImpl | 指定 MyBatis 所用日志的具体实现,未指定时将自动查找。 | SLF4J | LOG4J | LOG4J2 | JDK_LOGGING | COMMONS_LOGGING | STDOUT_LOGGING | NO_LOGGING | Not set |
完整的 settings 元素,有很多可以配置的选项,需要大家慢慢自己学习:
<settings>
    <!---->
     <setting name="cacheEnabled" value="true"/>
    <!---->
     <setting name="lazyLoadingEnabled" value="true"/>
    <!---->
     <setting name="multipleResultSetsEnabled" value="true"/>
     <setting name="useColumnLabel" value="true"/>
     <setting name="useGeneratedKeys" value="false"/>
     <setting name="autoMappingBehavior" value="PARTIAL"/>
     <setting name="autoMappingUnknownColumnBehavior" value="WARNING"/>
     <setting name="defaultExecutorType" value="SIMPLE"/>
     <setting name="defaultStatementTimeout" value="25"/>
     <setting name="defaultFetchSize" value="100"/>
     <setting name="safeRowBoundsEnabled" value="false"/>
     <setting name="mapUnderscoreToCamelCase" value="false"/>
     <setting name="localCacheScope" value="SESSION"/>
     <setting name="jdbcTypeForNull" value="OTHER"/>
     <setting name="lazyLoadTriggerMethods" value="equals,clone,hashCode,toString"/>
</settings>
Comments NOTHING